|
Crochet loop stitch! Fun and Funky!

Learn how to work crochet loop stitch to add pizzazz to your crochet projects. Read through my instructions first, then follow the pictures below as you try it out for yourself.
Work a sample first until you get the feel for it, then you can work it into your own projects. I'll give you some suggestions how to use it once you've tried it out. It's easy when you know how!

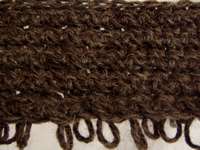
NOTE: The loops will end up on the side of the work that faces away from you and they should only be worked on every other row for a project with a right and wrong side. You can choose a different stitch for the in-between row, or just use single crochet.
If you want a scarf with loops on both sides then work it every row. You will find this stitch uses quite a lot of yarn and is fairly time-consuming at first, so you may want to use it only in stripes or sparingly.
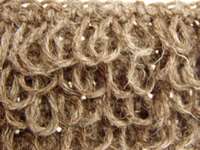
Chain 1, then * push your hook through the top of the next single crochet stitch. Hook the yarn and bring it back next to the hole you just came through (keeping it at the back of your work). Then, I find it easiest to put my middle finger over the yarn, then hook the yarn from above my finger (or yarn over again) and pull the two yarn overs through to the front of your work.
So you now have 3 loops on your hook at the front of your work and your left middle finger tied to the back of your work. Okay? Right, I'm off for coffee now - see you later! Just kidding...
All you do now is...yarn over again and pull through all 3 loops. One loop left? Great! That's it! That's all there is to the crochet loop stitch! Now keep practicing! Go back to the * and start again. Here's some pictures to help you out.

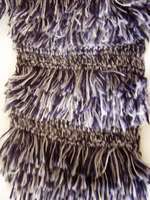
Here's a section of a scarf I made using crochet loop stitch. I cut all the loops to give a shag pile look. It took a while!!! The stitches will not unravel even if you cut the loops, as the way it is worked essentially ties off the ends.
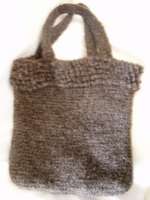
I also worked crochet loop stitch along the top edge of this bag for a little interest. The bag is felted so the loops have shrunk and are more like 'nubs'. If you want your loops longer, either wrap the yarn around your finger twice or use two fingers instead of one.
Anyway - I found that when I used the loop stitch around the top of the bag and felted it, that the loop stitch area was wider than the single crochet area. That's simply because of the extra strand of yarn coming through the work to secure the loop each time.
You can compensate for this by using an extra strand of a fine yarn when you work the narrower stitch, or you can just enjoy the different thicknesses as a design element. Either way it's up to you.
So, some suggestions for where to use crochet loop stitch? It looks great as collars and cuffs on sweaters or jackets or around the edge of a poncho. You could also work looped cuffs on a pair of gloves.
Hats can be pretty fun in this stitch too either as a band around the bottom or just loop the whole thing! You could work loops on the backs of kids mittens, then cut them to look like fur and embroider paw prints on the palms!
I crocheted some gloves for my son to match a dog hat I made for him. I still haven't stitched the paw prints on yet!! Must find time for that before he grows out of them!
Well, do enjoy your crocheting and be creative! Come back and visit again for more stitches, ideas and patterns!
Do you need to learn the basic crochet stitches first?
|


