|
Granny Squares.
|
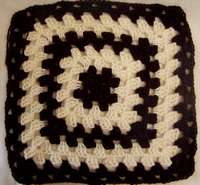
 Granny squares were the first crochet 'pieces' that I learned years ago. They can be small so you can join them together, or you could make a blanket from just one square by adding round after round. The choice is yours.
 This is just the absolutebasic common pattern, though you can find many, many variations these days.
For this pattern you will need to know chain,slip stitch anddouble crochet.
I used a 5.5mm hook and worsted weight 100% wool yarn. All rounds areworked from the same side - no need to turn your work over.Here we go with the basic granny squares pattern in plain English. Chain 4, join with slip stitch to form ring, then...
- Chain 3, *3 double crochet into ring, chain 1, repeat from * twice more, 2 double crochet into ring, slip stitch to chain 3 to join round.
- Chain 3, 3 double crochet into same space (between chain 3 of preiousround and first double crochet), *chain 1, skip next 3 double crochets, (3 double crochets, chain 1, 3double crochets into next chain 1 space - makes corner), repeat from * twice more,then chain 1, skip next 3 double crochets, 2 double crochets intochain 1 space where round started, slip stitch to chain 3 to join round.
- (Change color if desired - see below how to change to new color)Chain 3, 3 double crochets into space between chain 3 and first double crochet of previous round, *chain 1, skip next 3 double crochets, 3 double crochet into next chain 1 space, chain 1, (3 double crochets, chain 1, 3 double crochets) into next chain 1 spacerepeat from * twice more, then chain 1, 3 double crochet into next chain 1 space, chain 1, 2 double crochets into first corner chain 1space, slip stitch to chain 3 to join round.
- Chain 3, 3 double crochets into space between chain 3 and first double crochet of previous round, *chain 1, (3 double crochet in next chain 1 space,chain 1) twice, (3 double crochets, chain 1, 3 double crochets) into next chain 1 space (corner)repeat from * twice more, then chain 1, (3 double crochet into next chain 1 space, chain 1) twice, 2 double crochets into first corner chain 1space, slip stitch to chain 3 to join round.
- Continue in the same manner for any further rounds - always working 3 double crochet into each chain space - except at corners where youwork 3 double crochet, chain 1, 3 double crochet into the corner chain1 space.
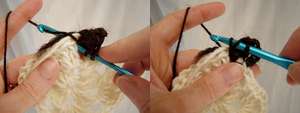
When you come to the slip stitch to join the round, push your hook through from front to back in between the chain 3 and the first double crochet. Instead of working your yarn over with the old color break that off, hold onto the new color tail and pull the new color through to the front and then through the stitch on the hook. Your new color is now ready to work.


Hold the tails of yarn along the top of your work and work over them as you form your double crochets, hiding them as you go.
Here's the granny squares pattern in abbreviations. Ch 4, join with sl st to form ring, then...
- Ch 3, *3 dc in ring, ch 1, rep from * twice more, 2 dc in ring, sl st to ch 3 to join rnd.
- Ch 3, 3 dc into same space (between ch 3 of prevrnd and first dc), *ch 1, sk next 3 dc, (3 dc, ch 1, 3dc in next ch 1 sp - makes corner), rep from * twice more,then ch 1, sk next 3 dc, 2 dc inch 1 sp where rnd started, sl st to ch 3 to join rnd.
- (Change color if desired - see below how to change to new color)Ch 3, 3 dc in space between ch 3 and first dc of prev rnd, *ch 1, sk next 3 dc, 3 dc in next ch 1 sp, ch 1, (3 dc, ch 1, 3 dc) in next ch 1 sprep from * twice more, then ch 1, 3 dc into next ch 1 sp, ch 1, 2 dc into first corner ch 1 sp, sl st to ch 3 to join rnd.
- Ch 3, 3 dc in sp between ch 3 and first dc of prev rnd, *ch 1, (3 dc in next ch 1 sp,ch 1) twice, (3 dc, ch 1, 3 dc) in next ch 1 sp (corner)rep from * twice more, then ch 1, (3 dc in next ch 1 sp, ch 1) twice, 2 dc in first corner ch 1sp, sl st to ch 3 to join rnd.
- Continue in same manner for any further rnds - always working 3 dc in each ch 1 sp - except at corners where youwork 3 dc, ch 1, 3 dc into the corner ch 1 sp.
Abbreviations used...
- ch - chain
- dc - double crochet
- prev - previous
- rep - repeat
- rnd - round
- sc - single crochet
- sk - skip
- sl - slip
- sp - space
- st - stitch
Granny squares, once you get used to them, are quick and easy. Theycan be joined either by crochet or sewing to form many different items.
The more common projects for granny squares are afghans, blankets, cushion covers, stoles or wraps.They can also be used for scarves, vests, ponchos, and even skirtsand bags. I'm making a felted bag from these samples. You'll see thepicture soon.
Colors can make a huge impact with your granny squares. Go forbasic black and white for stunning effects or go for more muted shadesfor a subtler look. For a splash of color in an afghan, use just 1color for most of your project and then add a rainbow square now and then.
Use 4 or 5 shades of one color in each square - dark to light and some light to dark - for a monotone but very effective look.
You don't have to join your granny squares straight - turn them at an angle andmake a diamond pattern for a 'handkerchief' hem skirt. They look great as diamonds in ponchos too.
What will you make with your granny squares? I love to hear about success stories, so tell me what you make with yours here and I'll start a gallery. Good Luck!
Try out a small crochet flower pattern.
Return to Homepage from Granny Squares


