Crochet Lattice Edging
Lovely Lacy Touch

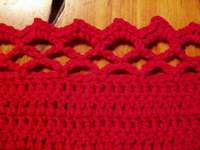
This crochet lattice edging is so pretty you'll be wanting to add itto lots of your projects, like cuffs, collars, or...thinking out of the box how about maybe even some window treatments. It's worked in chain,single crochet,slip stitch andtreble crochetin multiples of 4 + 1, ie. 12 + 1 = 13, or 40 + 1 = 41, etc. Let's get right to the instructions...I've used 25 stitches in my sample.Join your yarn in at the corner of your project by pulling itthrough the right corner stitch where you want to start the edging. - *Chain 5, skip next 3 stitches, slip stitch in next stitch,repeat from * ending with slip stitch in last stitch. Turn.
- *Chain 5, slip stitch in 3rd of next 5 chains, repeat from * 5 times,chain 3, 1 treble in last stitch.Turn.
- *Chain 5, slip stitch in 3rd of next 5 chains,repeat from * ending with slip stitch in last stitch. Turn.
- Chain 1, (3 single crochet, 2 chain, 3 single crochet) in each 5 chain space, ending with slip stitch in last stitch. Finish off.
See, I said crochet lattice edging was easy, didn't I? Wouldn't it make great cuffs on a summer cardigan or a pretty edgearound a poncho? You must check out the cool free scarf pattern worked in lattice stitch. Short and very sweet, you can try the crochet lattice edging on whateveryou want. Another option - instead of working the single crochet along the edgetry tying tassels on each point of the lattice. So many choices, so little time. Enjoy!
Have you tried the crochet rope edging?
How about the scallop edge too?
Return to Homepage from Crochet Lattice Edging
|