|
Crochet Shell Edging Ideas
|
These crochet shell edging ideas can help you widen a narrow edge into something a little more fancy. One of my site visitors had asked me how she could widen a basic shell edging, so I thought you might like to find out my answers to that one too.
Here I'll give you some suggestions on how to expand your edging repertoire by simply making your shell edging as wide as you like.
I have 3 variations on the basic shell edging, which will help you pretty up your projects.
First of all you should work one row of shell edging around your project, then check out these pictures to see which look you'd prefer.
Usual abbreviations apply.
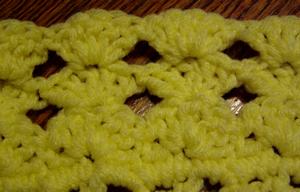
Option 1 - Open Shells

First of all we have a row of shells worked directly on top of the previous shells. This gives the most open look of the 3 choices. Each new shell is worked into the center double crochet of the shell below.
So - you'd work a 5 dc shell into each center dc of the shell below, with no stitches in between just a row of 5 dc shells, one after the other.
If you start at the center of a shell, then your join would be invisible, as the center dc would be the start ch that you'd sl st into at the end of the round. If you start at the beginning of a shell, then you'd need to sl st to the start af your shell, then work 2 ch to raise the row to the correct height for the next row of shells.
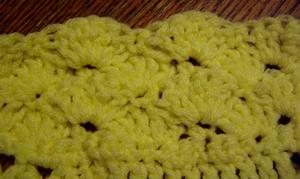
Option 2 - Closed Shells

This choice gives more of a solid look, as you work your second row of shells into each sc in between the shells of your first row and join each new shell with a sc in the center dc of the previous row. This one is easier to hide the join.
If you start at the beginning of a shell on the previous row, then you ch 2, 2 dc in same st (ie. in base of chain), then [sc in center dc of shell on prev row, 5 dc in next sc of prev row] to end. Finish by working 2 dc into base of start ch, then sl st join to 2nd start ch.
If you start from the center of a shell on the prev row, ch 1, work 5 dc into the sc of prev row, then sc in center dc of shell on prev row. At end of rnd, sl st to ch 1.
Now, one more option for a crochet shell edging...
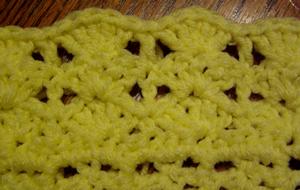
Option 3 - Shell with Dc

This option is an 'in-between' version. It has a shell into each center dc of prev row and dc into each of the sc on the prev row. So - Starting at the beginning of a shell, ch 2 (counts as dc), [5 dc in center dc of shell on prev row, dc into sc of prev row] to end, sl st to 2nd ch of start ch.
Starting from the center of a shell, ch 2 (counts as dc), 2 dc in same st, [dc in sc of prev row, 5 dc in center dc of shell on prev row], to end, 2 dc in same sp as ch 2, sl st join to 2nd ch of start ch.
So - here are 3 crochet shell edging ideas for you to make your edges wider and maybe more effective. These would look great as edges on a baby blanket or even as sleeve ends or at the bottom of a sweater. You choose!
Return to Crocheted Edgings from Crochet Shell Edging Ideas


