|
Easy Felted Potholder Pattern
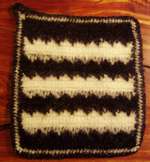
Check out this easy felted potholder pattern. Worked in 100% wool yarn with a zig-zag design, it works up very quickly. Boil it in a pot on the stove to felt it (or toss it in your washer), let it dry and it's ready to use. (Boiling not recommended for places at high altitude). So easy - all you need is...
You only need to be able to work chain, single crochet and slip stitch. The size before felting is 11.25 x 11 inches, with the gauge being 13sts x 18rows = 4 inches. Size after felting = 8.75 x 9.5 inches (size will vary with felting method or number of washes). This pattern makes a large potholder or small trivet. Abbreviations
Pattern instructions for colorwork...(pattern is in [multiples of 4] + 1)
That's the crocheting over - now to do the felting part of your easy felted potholder pattern. Check out the page on boiled wool or how to felt wool for instructions. Make sure to finish off your ends BEFORE you do your felting or you may end up with lumps of felted wool that you won't be able to fit through the eye of your needle. That was easy, right? A great idea for a gift for the person who has everything. There's always room for another potholder in any kitchen! If you'd like to make a set of placemats or a larger piece to match your easy felted potholder pattern - you can use the same pattern. Just add stitches in multiples of 4. Adding 12 more stitches adds almost an extra 4 inches -pre-felted size- then you'll need to work more rows, and of course you'd need extra yarn. Don't forget - felting will shrink your project by approximately 25%. That's why this one starts off way bigger than a potholder would usually be. Some benefits though...
These benefits make wool the perfect choice for your easy felted potholder pattern. Try different color combinations - at 1-2oz for each potholder that shouldn't break the bank. Try each stripe a different color to help use up your scraps. Think of the color preferences of the person you're creating for and let's get you started. A perfect beginner project, but the results will look far from easy. Enjoy! How about a lattice scarf as another gift? |


