|
Free Crochet Hat Pattern - Try It Now!
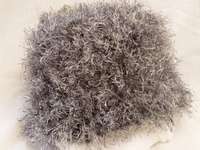
This free crochet hat pattern is my favorite! It's so easy but very versatile. I had my first one made in a couple of hours! I've made many more and sold some at local craft events too. This picture shows the basic hat shape worked with one strand of Lion Brand Fun Fur and one strand of a light worsted weight mohair blend yarn. I work it in one piece from the crown down. The size is easily adjusted not by stitches, but by the thickness of yarn you use and the length from the crown. This particular size and thickness of yarn will produce a hat to fit a 21"-22" head size. 
If you think about it - when you pull on a hat it stretches to fit, right? Well, if you work it longer it will fit a larger head size, as there will be more length to stretch around your head!
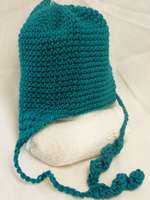
I used just one strand in a worsted weight acrylic to a length of 7 inches then worked earflaps. This version of the free crochet hat pattern fits my 3 year old son and he loves it. It's only a little roomy and will last him a good while. That's the green one you see here!
These samples are all worked with the same size hook and the same number of stitches. Only the yarns are different! Just goes to show what a big difference your choice of yarn can make! You can adjust the look and size just by your choice of yarn! Magic! So - I think I need to get to the pattern now! By the way, do not turn at the end of each row. Work from the same side the whole way. The side facing you is usually the right side, but in this case the side away from you has more 'fur' so use that as the 'right' side!
You will need...
Stitches (sts) needed are... chain stitch, single crochet and slip stitch.
For the brim...follow these instructions once you reach your desired length...
I like an 8 inch length for my hats - that's what feels comfortable to me. It's your free crochet hat pattern - make it comfy for you! I think it's pretty simple - only 3 stitches to learn. The instructions for those stitches are linked above the pattern where it says "stitches needed". 
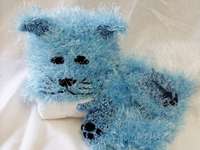
Finally - this picture shows what I call my "Cat Hat Set"! It's a hat (obviously) made in exactly the same way as this free crochet hat pattern, but it has a tail at the back. There's also a scarf and a pair of mittens. The tail hasa split in the top so you can slip the scarf through so it doesn't get lost! The mittens have paw prints embroidered on and the cat face is embroidered too! Fun, eh? I saw this one night in my head - couldn't sleep that night, so I just had to try it! I think it's really cute! I'll be making patterns for other animal hat sets too! If you like this design, look out for my ebook in the not too distant future! In the meantime...enjoy working with your free crochet hat pattern! I'm sure you'll be making more than one! This pattern is for personal use only, not to be reproduced. Try the free crochet scarf pattern too for a neat looking set!
|


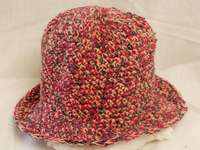
 I also worked this free crochet hat pattern with a brim to see what it would look like - fun and funky I think! This picture shows the brimmed hat in 3 strands of fingering weight yarn. I've made these for a good friend of mine, my sister-in-law and her daughters - they all love this version!